VoyageMPD0.9.1をStarter Kitへインストール(1)
================================
VoyageMPD0.9.1をStarter Kitへインストールする
================================
ここでは、ALIX3D2のCFカードへVoyageMPD0.9.1をインストールします。
今回は、VoyageMPDを最新の0.9.1へバージョンアップしますので、新規に「VoyageMPD Starter Kit」を購入したい方や初期設定の方法を知りたい方などは
PCオーディオ実験室さんの「Voyage MPD Starter Kit」が届きました を参照して下さい。
とても新設丁寧な解説があります。
1.機材の用意
(1)パソコンを2台用意する
1台目は通常使用しているWindowsPCに「Poderosa」などの Windows 用ターミナルエミュレータをインストールしてVoyageMPDにSSH接続します。
Windows 用ターミナルエミュレータは好みに応じて用意して下さい。
ちなみに私が愛用している「Poderosa」、私のところではWindows7 32bit/64bit両方で動作しています。
無論、WindowsXPでも大丈夫。
2台目は、光学ドライブ付きのPCのドライブにVoyage MPD「LiveCD」を入れて起動し、CFカードへVoyage MPDをインストールします。
条件は、
1.光学ドライブからOS(VoyageLinux=Voyage MPD)を起動できること。BIOSの設定が必要な機種もあります。
2.CFカードの読み書きが出来るインターフェースがあること。
私の場合、SATA接続タイプのカードリーダーで書込できました。
どうしてもUSB接続タイプのカードリーダーでは失敗してしまいます。
私の2台目パソコンの仕様はこのようなものです。
SATA接続タイプのカードリーダーは、「玄人志向 KRHK-CF3.5SATA」というキワモノ(笑)シリーズでやってみなければ分からないというキワモノです。
実は、2台目のパソコン1台だけでもCFカードへインストールは可能です。
インストールの手順を紙に印刷しておいて、キーボードからLinuxのコマンド手打ちすれば作業は進みますが、キーボード入力に自信が無い方(自分もそうですが)は、もう1台のパソコンからSSH接続して、参照文献(WEBサイトなど)を表示しておいて、コピー&ペーストする方が確実です。
2.VoyageMPDのLiveCDを用意する
1台目のWindowsPCで、VoyageMPDのLiveCDイメージファイル(今回は voyage-mpd-0.9.1.iso)をダウンロードしてCD-Rなどに焼いておきます。
焼き方を知りたい人は、
・ISOイメージファイルの焼き方、ISO形式のCD・DVDの作り方
・Windows 7/8でISO/IMGファイルをCD/DVD-Rに書き込む
などなど、少し検索すれば沢山でてきます。
3.2台目のパソコンでVoyageMPDを起動する
CFカードをリーダーライターにセットしておき、焼いた「LiveCD」を光学ドライブへ入れた後、パソコンを起動すればCDを読込始め、BOOT MENUが表示されたら「voyage linux」を選択すれば起動します。(そのまま何もしなくてもデフォルトで起動します)
ユーザーアカウント:root
パスワード:voyage
でログインしてから
root@voyage:~# ifconfig コマンドでこの2台目パソコンのIPアドレスを確認しておきます。
例:192.168.0.**
紙などにメモして覚えておきます。
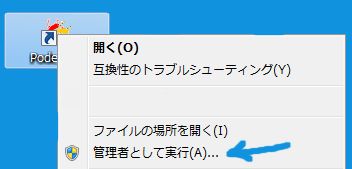
4.1台目のパソコンで「Poderosa」を起動する
Windows7の場合は「Poderosa」アイコンを右クリックして、「管理者として実行」にて起動する。
 |
ファイルメニュー>>新規Telnet/SSH接続で新規接続
ホスト:192.168.0.** ←先ほどメモした2台目パソコンのIPアドレス
プロトコル:SSH2
アカウント:root
パスフレーズ:voyage
でOKをクリックすると
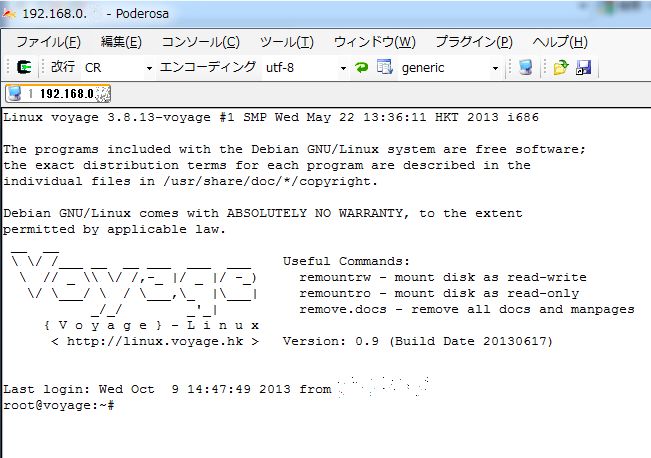 |
のようにVoyageMPDへPoderosaでログインできました。
以降は、Poderosaで接続しながら操作します。
5.いよいよインストール開始
(1)VoyageMPDインストールフォルダーを用意
root@voyage:~# mkdir /tmp/root /tmp/cf
root@voyage:~# mount -o loop /lib/live/mount/medium/live/filesystem.squashfs /tmp/root
root@voyage:~# cd /tmp/root
—————————-(ここで注意)—————————————————-
バージョン0.8.5までは 2行目
root@voyage:~# mount -o loop /live/image/live/filesystem.squashfs /tmp/root
でOKだったのですが、バージョン0.9.0からは
root@voyage:~# mount -o loop /live/image/live/filesystem.squashfs /tmp/root
/live/image/live/filesystem.squashfs: No such file or directory
とエラーがでます。
root@voyage:~# find / -name filesystem.squashfs で調べると
/lib/live/mount/rootfs/filesystem.squashfs
/lib/live/mount/medium/live/filesystem.squashfs と表示されので
root@voyage:~# mount -o loop /lib/live/mount/medium/live/filesystem.squashfs /tmp/root
と修正してやります。
—————————–(ここまで)———————————————————
(2)CFカードを確認・フォーマットする
2台目のパソコンにCFカードをマウントしてインストールするわけですが、2台目のパソコンのCFカードへインストールするつもりが、誤ってHDD等をフォーマットしてしまうと取り返しの付かないことになります。
ですから、私の場合は2台目のパソコンの内蔵HDDへの電源ケーブルを抜いて、CFカードのみにしました。
OSは光学ドライブから起動しますので、HDDドライブは不要です。
接続されている記憶媒体(CFカード)を確認する
root@voyage:/tmp/root# fdisk -l
Disk /dev/sda: 4009 MB, 4009549824 bytes
68 heads, 63 sectors/track, 1828 cylinders, total 7831152 sectors
Units = sectors of 1 * 512 = 512 bytes
Sector size (logical/physical): 512 bytes / 512 bytes
I/O size (minimum/optimal): 512 bytes / 512 bytes
Disk identifier: 0x00000000Device Boot Start End Blocks Id System
/dev/sda1 2048 7831151 3914552 83 Linux
この場合、CFカードのみ接続されているため、/dev/sda1 と認識されています。
また、このCFカードは旧バージョンのVoyageMPDが入っていたり、何度もインストールの練習をしているため、最初から「Linux」となっています。
一度、パーティションを削除して、作成し直します。
root@voyage:/tmp/root# fdisk /dev/sda
Command (m for help): d enter
Selected partition 1
Command (m for help): n enter
Partition type:
p primary (0 primary, 0 extended, 4 free)
e extended
Select (default p): p enter
Partition number (1-4, default 1): 1 enter
First sector (2048-7831151, default 2048): enter
Using default value 2048
Last sector, +sectors or +size{K,M,G} (2048-7831151, default 7831151): enter
Using default value 7831151
Command (m for help): w enter
The partition table has been altered!
Calling ioctl() to re-read partition table.
Syncing disks.
フォーマットします。
root@voyage:/tmp/root# mkfs.ext2 /dev/sda1
mke2fs 1.42.5 (29-Jul-2012)
Filesystem label=
OS type: Linux
Block size=4096 (log=2)
Fragment size=4096 (log=2)
Stride=0 blocks, Stripe width=0 blocks
244800 inodes, 978638 blocks
48931 blocks (5.00%) reserved for the super user
First data block=0
Maximum filesystem blocks=1002438656
30block groups
32768 blocks per group, 32768 fragments per group
8160 inodes per group
Superblock backups stored on blocks:
32768, 98304, 163840, 229376, 294912, 819200, 884736Allocating group tables: done
Writing inode tables: done
Writing superblocks and filesystem accounting information: done
ext2の設定条件を変えます
root@voyage:/tmp/root# tune2fs -c 0 /dev/sda1
tune2fs 1.42.5 (29-Jul-2012)
Setting maximal mount count to -1
(3)いよいよインストール
root@voyage:/tmp/root# /usr/local/sbin/voyage.update
以下インストールのための設定項目を質問形式で入力する
質問の下にdefaultで選択番号が表示されるので確認しながらすすみます
What would you like to do?
1 – Create new Voyage Linux disk
2 – Update existing Voyage configuration
3 – Exit
(default=1 [Create new Voyage Linux disk]):enter
some mandatory options are unset, please enter them interactively Where is the Voyage Linux distribution directory? (default=/tmp/root):enter
What would you like to do?
1 – Specify Distribution Directory
2 – Select Target Profile – this overwrites current settings
3 – Select Target Disk
4 – Select Target Bootstrap Loader
5 – Configure Target Console
6 – Partition and Create Filesystem
(default=2 [Select Target Profile – this overwrites current settings]):enter
Please select Voyage profile:
1 – Keep existing settings
2 – 4501
3 – 4511/4521
4 – 4801
5 – 5501
6 – 6501
7 – ALIX →今回はALIX3D2
8 – Generic PC
9 – Notebook (pcmcia)
10 – WRAP
(default=7 [ALIX]):enter
What would you like to do?
1 – Specify Distribution Directory
2 – Select Target Profile – this overwrites current settings
3 – Select Target Disk
4 – Select Target Bootstrap Loader
5 – Configure Target Console
6 – Partition and Create Filesystem
(default=3 [Select Target Disk]):enter
Partitions information
major minor #blocks name
8 0 3915576 sda
8 1 3914552 sda1
11 0 4473408 sr0
7 0 75864 loop0
7 1 75864 loop1
Which device accesses the target disk [/dev/hde]? /dev/sda
Which partition should I use on /dev/sda for the Voyage system [1]?enter
Device information for /dev/sda1
device fs_type label mount point UUID ———————————————————————————————————————
/dev/sda1 ext2 (not mounted) 22c3cc0e-a7a2-420e-8001-0b13c348f557
Where can I mount the target disk [/tmp/cf]?enter
What would you like to do?
1 – Specify Distribution Directory
2 – Select Target Profile – this overwrites current settings
3 – Select Target Disk
4 – Select Target Bootstrap Loader
5 – Configure Target Console
6 – Partition and Create Filesystem
(default=4 [Select Target Bootstrap Loader]):enter
Which loader do you want (grub or lilo) [grub]?enter
Which partition is used for bootstrap [1]?enter
What would you like to do?
1 – Specify Distribution Directory
2 – Select Target Profile – this overwrites current settings
3 – Select Target Disk
4 – Select Target Bootstrap Loader
5 – Configure Target Console
6 – Partition and Create Filesystem
(default=5 [Configure Target Console]):enter
Select terminal type:
1 – Serial Terminal
2 – Console Interface
(default=1 [Serial Terminal]): 2
What would you like to do?
1 – Specify Distribution Directory
2 – Select Target Profile – this overwrites current settings
3 – Select Target Disk
4 – Select Target Bootstrap Loader
5 – Configure Target Console
6 – Partition and Create Filesystem
(default=6 [Partition and Create Filesystem]):enter
What shall I do with your Flash Media?
1 – Partition Flash Media and Create Filesystem
2 – Use Flash Media as-is
(default=1 [Partition Flash Media and Create Filesystem]):enter
What would you like to do?
1 – Specify Distribution Directory
2 – Select Target Profile – this overwrites current settings
3 – Select Target Disk
4 – Select Target Bootstrap Loader
5 – Configure Target Console
6 – Partition and Create Filesystem
(default=7 [Copy Distribution to Target]):enter
Configuration details:
———————-
Distribution directory: /tmp/root
Disk/Flash Device: /dev/sda
Installation Partition: /dev/sda1
Create Partition and FS: yes
Bootstrap Partition: /dev/sda1
Will be mounted on: /tmp/cf
Target system profile: ALIX Target console: standard
Bootstrap installer: grub Bootstrap partition: /dev/sda1
OK to continue (y/n)? y
Ready to go ….
Checking that no-one is using this disk right now …
OK
Disk /dev/sda: 487 cylinders, 255 heads, 63 sectors/track
Old situation:
Warning: The partition table looks like it was made
for C/H/S=*/68/63 (instead of 487/255/63).
For this listing I’ll assume that geometry.
Units = cylinders of 2193408 bytes, blocks of 1024 bytes, counting from 0
Device Boot Start End #cyls #blocks Id System
/dev/sda1 0+ 1827 1828- 3914552 83 Linux
end: (c,h,s) expected (1023,67,63) found (803,67,63)
/dev/sda2 0 – 0 0 0 Empty
/dev/sda3 0 – 0 0 0 Empty
/dev/sda4 0 – 0 0 0 Empty
New situation:
Units = cylinders of 8225280 bytes, blocks of 1024 bytes, counting from 0
Device Boot Start End #cyls #blocks Id System
/dev/sda1 * 0+ 486 487- 3911827 83 Linux
/dev/sda2 0 – 0 0 0 Empty
/dev/sda3 0 – 0 0 0 Empty
/dev/sda4 0 – 0 0 0 Empty
Successfully wrote the new partition table
If you created or changed a DOS partition, /dev/foo7, say, then use dd(1)
to zero the first 512 bytes: dd if=/dev/zero of=/dev/foo7 bs=512 count=1
(See fdisk(8).)
mke2fs 1.42.5 (29-Jul-2012)
Filesystem label=
OS type: Linux
Block size=4096 (log=2)
Fragment size=4096 (log=2)
Stride=0 blocks, Stripe width=0 blocks
244800 inodes, 977956 blocks
48897 blocks (5.00%) reserved for the super user
First data block=0
Maximum filesystem blocks=1002438656
30block groups
32768 blocks per group, 32768 fragments per group
8160 inodes per group
Superblock backups stored on blocks:
32768, 98304, 163840, 229376, 294912, 819200, 884736
Allocating group tables: done
Writing inode tables: done
Writing superblocks and filesystem accounting information: done
tune2fs 1.42.5 (29-Jul-2012)
Setting maximal mount count to -1
Setting interval between checks to 0 seconds
Copying files …. done
Removing pcmcia from update-rc.d
update-rc.d: using dependency based boot sequencing
Removing dnsmasq.pxe.conf in /etc/dnsmasq.more.conf
Reconfiguring resolvconf
Updating /etc/hosts
Installing grub
Copy grub files from /tmp/cf to /tmp/cf/boot/grub
Setting up grub under chroot /tmp/cf
copyfiles.sh script completed
What would you like to do?
1 – Specify Distribution Directory
2 – Select Target Profile – this overwrites current settings
3 – Select Target Disk
4 – Select Target Bootstrap Loader
5 – Configure Target Console
6 – Partition and Create Filesystem
(default=8 [Exit]):enter
/usr/local/sbin/voyage-install.sh: .voyage-install.conf: Read-only file system
/usr/local/sbin/voyage-install.sh: test.conf: Read-only file system
念のため、シャットダウンしてからカードを取り出す。
root@voyage:/tmp/root# shutdown -h now
しかし、このコマンドではパソコンは電源が落ちていないので、enterキーを押してはじめて電源が落ちる。
完全に電源が落ちているのを確認してからCFカードを取り出す。
以上で、CFカードへのインストールは終了です。
(1)VoyageMPD0.9.1をStarter Kitへインストール(0) へ戻る
(2)VoyageMPD0.9.1をStarter Kitへインストール(1) この記事
(3)VoyageMPD0.9.1_Starter Kitの簡単初期設定 へ進む

![]()

![]()
タグ
2013/10/10 | コメント/トラックバック(0) | トラックバックURL |
カテゴリー:VoyageMPD